Choose your language..

Monday, December 24, 2012

Christmas BonBon Cookies! Fun Project!

Hello everybody! Since tomorrow is Christmas, today I have to post this to all of you, so you can make your own BonBon Cookies for happy day tomorrow! :D This cookies was great for gift to someone.. :)

So, my inspiration is from Martha Steward. I watch her cooking video, and I got hooked. And came out with this great cookies (Lemon Cassis Bon Bon Cookie). Today I made this cookies with my friend, Desi. She help me a lot and took many great photos. Thank You! ;)
This cookies was called "BonBon", that is mean "GoodGood". Bon is french for Good. And, this cookies was as good as the taste and looks. I made this cookies with my modification, because of some reason, like I'm using vanilla extract instead of lemon extract because I can't find any lemon extract in Indonesia, and I'm using Sunkist orange zest instead of lemon. For the glaze, Martha's recipe using Cassis (Blackcurrant liquor) but, I prefer using Kirsh essence that taste beautiful! :D

Christmas BonBon Cookie

Ivan Wongso
Ingredients
113gr Unsalted Butter
1/2 cups superfine Sugar
1 tsp Vanilla Extract
1 Sunkist orange Zest
1/8 tsp Salt
1 1/3 cups plus 2 tbsp All purpose Flour
3 tbsp Corn Flour
2 tbsp Fresh Milk
Glaze:
3 cups Superfine Sugar
1/4 cup plus 1 tbsp Hot Water
1/4 cup corn syrup
1 tbsp veg oil
1 tsp Kirsh essence or other essence
Food Coloring (I'm using neon color green and pink)
Royal Icing (for decor) :
1 1/2 tbsp Meringue Powder
3-4 tbsp Warm water
225gr Confectioner Sugar

Steps:
For BonBon Cookies:
  1. Preheat oven to 165 degrees Celsius.
  2. In a medium bowl, whisk together All purpose flour, Corn flour, Salt and Orange Zest. Set aside.
  3. Using electric mixer (paddle attachment), beat soften butter and sugar until well mixed. Then, with the mixer running on low, gradually add the mixed flour. Continue beating until the the mixed become like sand. 
  4. Add Fresh Milk and Vanilla Extract, and keep beating until formed dough.
  5. On a clean surface, transfer the dough. Cut the dough to 2 equal ball, then make a long log. Cut each log to 14 pieces, so the dough will end up with 28 equal pieces.
  6. Roll each pieces to dome, then place the domes on the pan lined with silpat or parchment paper.
  7. Freeze the dough for about 10-15 minute to help hold their shape.
  8.  Then allowed the pan to come to room temp before put it to oven, about 5 min.
  9. Bake BonBon for 25 minute. The cookie will be white, but the bottom will be golden. 
  10. Take off from the oven and let it cool to room temperature before glaze it.
For Glaze:
  1. In a bowl, sieve superfine sugar to prevent lumps.
  2. Then, add all other ingredient beside food coloring and mix well using whisk. The consistency is thick, but stream when you pour it.
  3. Divide the glaze to 2 smaller bowl, and mix each with food coloring. Mix well.
  4. Using fork and spoon, Glaze the BonBon. Twice glaze each BonBon after all.
  5. Place on the cooling rack fitted with pan for easy cleaning. And let the BonBon dried up.

Using fork and spoon for the glaze..

The Consistency for the glaze..


For Royal Icing:

  1. Using electric mixer, beat all the ingredient using whisk attachment for about 5 minute, until reach the hard peak consistency.
  2. Add more water to adjust the consistency for piping, the using spatula, mix it well.
  3. Put in a piping bag with small round tip and decorate! 

Have fun making this cookie in this great Christmas Holiday or made together with someone.. :D
Enjoy, and Merry Christmas and Happy New Year!

Smiling,
Ivan :)

Thursday, October 25, 2012

TRICK or TREAT!! Surprise Cookies! PROJECT Day!

Halloween is next week! Horray! :D I'm planning to be a bloody pig with knife in my head. Hahahaha.. I'm using my pig mask that I bought in Hong Kong last year and knife headband that I bought in Universal Studio in USA, and blood effect paste that I bought online. Yeahhh, I will look scary! :P Hhahaha.. But its only in my mind. :) By the way, since, traditionally, in Halloween we gave each other treat, so, today are PROJECT day! You will get Recipe and Printable Tag!
UPDATED! This is my Halloween Costume! :P
My sister and me.. :D
Today, I bake 12 pieces Special COFFIN Surprise Cookies! The idea and recipe is came from not martha (Thank You, Megan! :D) She made a beautiful Halloween cookies with beautiful photograph. So, last week, I prepare everything, I bought Halloween cookies cutter Wilton 7pcs (the box is shape like coffin), Wilton Skull sprinkle (I wish I can get the bug like in the not martha, but they don't have it) and everything else (colored sanding sugar, Wilton eye candy, mini candy coating chocolate like M&M). And today, I made this cookies with a little modification. I decided to make 1 shape, because I LOVE the Idea using coffin, and that is why I buy this cookies cutter from Jakarta (Indonesia).

So this is what my TRICK or TREAT!! Surprise Cookies looks like: :D

Since the original recipe is using food coloring, and I found that difficult to get the dark color like I wish, so I modified the recipe by adding chocolate powder. This is the recipe:

CHOCOLATE COFFIN SURPRISE COOKIES!
Original recipe is from Trick-Or-Treat Cookies for Halloween

1 cup unsalted butter (227grams)
3/4 cup superfine sugar (castor sugar)
1 egg
1/2 tsp vanilla extract
2 cups plus 1/3 cup all-purpose flour
3 tbsp unsweetened chocolate powder
1/4 tsp salt
1/8 tsp baking soda

for glue:
1 cup powder sugar
4 teaspoon water or milk

surprises:
Candy coated chocolate
Colored sanding sugar
Halloween sprinkle and else

Steps:

  • Whisk together the AP flour, salt, chocolate powder and baking soda. Set to aside  for a while.
  • Using mixer, cream the butter and sugar until all well combined. 
  • Add the egg and vanilla to the creamed butter until well mixed.
  • Then, add the dry ingredient and mix until all well combined.
  • Chill, roll, cut, bake and decorate!
  • Bake in 350 F or 180 C for 10 minutes.
  • For the sugar glue, just mixed the sugar with water a little bit a the time until you get the thick paste
  • Sandwich the full cookie and the center cookie, then fill the hole with candy or other, then sandwich the full cookie as the cover. And let it sit for a while until the glue is dry and strong. 
  • And package the cookies, and print the tag(below) and stick it to the packaging!
Tips:
I'm using 2 layer of plastic wrap and I put the cookie dough n the middle of it. Then I rolled using 2 different thickness of rolling pin, one about 3 mm and other one about 8 mm. I rolled the dough the chilled. most people chilled the dough then rolled, I found that rolled help a lot time and effort. And I put the rolled dough in frezzer for about 15-30 minute, the dough is ready to easyly cut. For the thick part cookie, make sure the dough is not to firm, because it can make the cookie crack when you cut out the centre. I cut the centre of my cookies using egg shape and circle cookies cutter. Bake all the cut cookies a cold temperature, so the won't spread. If you find that you need browner color, add food coloring. Just remind you, the cookie will come out darker after you bake it.

For finishinig touch, put your cookies in plastic packaging and tied a black or other color ribbon or string or else with this cute PRINTABLE TAG, that I design specially for this Halloween season!

Save the the image, print it in photo paper A4 then cut and punch the hole! And you have the Creative and Cute tag for your Cookie packaging!

I hope you enjoyed this Halloween PROJECT season this time! Have a GREAT Halloween Season! ;)

BOO!
Ivan :P

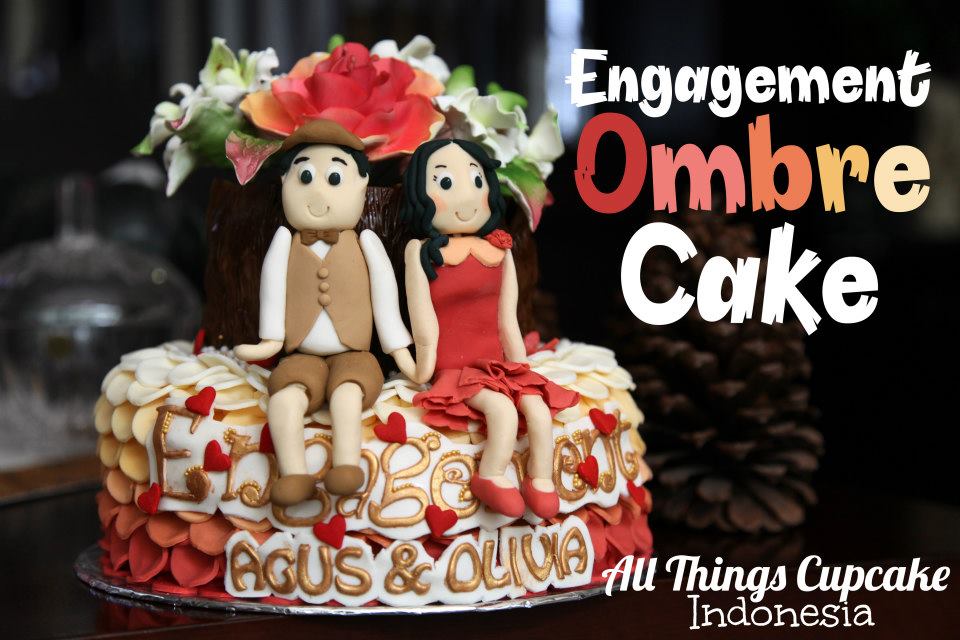
Engagement Ombre Cake!

Hello everybody! Long time no see! Yes, I'm very busy and tired since this year (2012-2013) I moved school to SIS, Surabaya International School. And, I decided to close my online business for while, maybe about 3 months, so I can focused in my responsibility as a high school student. :D

Okey,.. since today is in service day in my school, I want to show you about my last order, that is Engagement Ombre Cake. Do you know what is ombre? Ombre is gradation color. Some people said, ombre is the popular thing after rainbow, that is very popular now. Anyway, this cake is ordered by my aunt Olivia for her engagement tradition (Chinese, I think :P) that is exchange tray. She asked me to design with 2 layer "real" cake (I mean, not dummy cake) and she want to have 2 fondant figurine of her and her mate. And, with all may creations, I made this cake!


The ruffled idea is came from CAKE COUTURE Books by ANNIE DAM. It was a great book, with step by step amazing decorated fondant cake. I made this cake about 8 hour. 4 hour is made the top part and half of the ruffled plus making and drying the figurine, 4 hour in the next day is finishing the ruffled, making the engagement word and names then paint them and finishing part. 

The ombre color is similar to the flower color (planned). The color is made by the mix of burgundyand red, and there is yellow color that is mixed of yellow and ivory. The other color is mixed by both of them and for the lighter color, mixed with white fondant. The pot (wood) is made by painting of a mixture brown food coloring mixed with food grade alcohol (you can use lemon extract or vodka if you wish). I did that because, I found that brown color is difficult to get by mixing the food color to fondant, like most of case to get deep red and black fondant. The texture of wood is using Makin's Texture sheet. 

For the engagement words, I'm using FMM Funky alphabet and the names are using JEM alphabet. Both are using fondant that mixed by CMC powder to make it strong when it dry. The key of using any detail alphabet tool like FMM is very thin of fondant. The best way to do it is by using rolling pin that have "rings" that you can adjust the thickness of your fondant. If your fondant is not thin enough, it will stick at the tools. There is many tutorial at youtube that really help me to work with this tools. To make the gold color for the words, I'm using gold lustre dust and mixed with a little alcohol, than just brush at the alphabet, if the color is not gold enough, you can brush lightly the dry gold lustre dust to the alphabet, just remember, to much bushing with alcohol can make your alphabeth soggy, but if you have much time, the alcohol will evaporate anyway. :)

And the last thing I want to say is, Congratulation to my aunt and her mate for the Engagement! 

Yeah, that's all I can't share with you today, I you have any question, please, I'll not bite you! :P

Very BIG smile,
Ivan

Friday, August 10, 2012

Strawberry and Blueberry Cake Give away!

Fuihh! What a busy month! Hello everybody! :D Today, I want to share with you about my Aunt's order to celebrate her birthday by giving each of his friend this elegant mini cake.. :)


Beautiful right?
The cake base is using rainbow cake but only red and purple colored and tasted (using strawberry and blueberry flavoring powder). On top frosting is Classic American frosting, that made from whisking (using mixer) hot syrup (from sugar and water) and stiff whisked egg whites. If you want to made this frosting, you should have candy termometer, and standing mixer with steel bowl, like my kitchen aid :P If you don't have these, you will end up with melted frosting over your cakes! This frosting is really nice and keep in mind, DON'T REFRIGERATED! The frosting will be melt too. So, Don't combine cream cheese frosting for filling and american frosting for covering and decorating.  


For the fence, I'm using mini wafer stick. The elegant efeect on the top of the cake is using malaysian decorating color powder (Tan Sen Fong brand) Pic: My Food Coloring Collection!(4 tall bottle on the back)
It's quite fun to decorated with this malaysian product. Simple, just pour the powder in the middle of the cake, than spin the lazy susan (rotating decorating table), at the same time blow the powder to the side. This process really created a beautiful effect on the cake.

Okey, see you later.. :P Hope you all have a great weekend!

Tired face,
Ivan.. :)